Time-Based Conflict Mitigation in Near-RT RIC
Overview
This tutorial details the experimental setup and procedures for deploying and testing an O-RAN Near-Real-Time RAN Intelligent Controller (Near-RT RIC) with xApps. It covers the complete process from environment setup to xApp deployment and testing.
Note
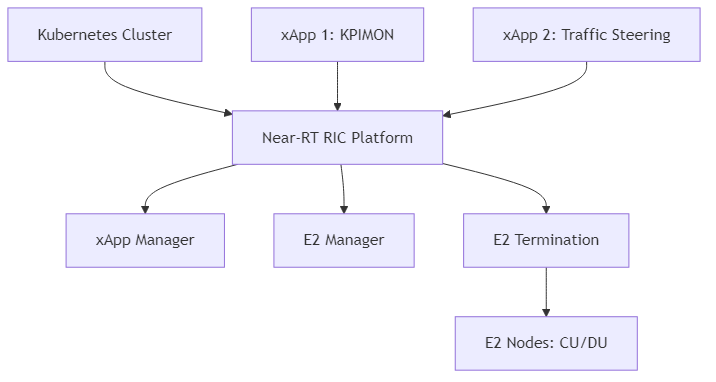
The diagram above shows the experimental setup for the Near-RT RIC, including the Kubernetes cluster, Near-RT RIC platform components (xApp Manager, E2 Manager, E2 Termination), xApps (KPIMON, Traffic Steering), and E2 Nodes (CU/DU).
Note: Before deploying the experiment, ensure you have proper access to the testbed (e.g., SSH access to the gateway node and virtual machines).
Objective
Deploy Near-RT RIC: Set up a Near-RT RIC platform in a Kubernetes environment.
Develop and Deploy xApps: Create and deploy example xApps on the Near-RT RIC platform.
Connect to E2 Nodes: Establish connections between the Near-RT RIC and E2 Nodes (CU/DU).
Test and Validate: Verify the functionality of the Near-RT RIC and xApps.
Understand O-RAN Architecture: Gain practical knowledge of O-RAN components and their interactions.
Resources
- Hardware:
Server with sufficient resources (minimum 8 CPU cores, 16GB RAM, 100GB storage)
Network connectivity to E2 Nodes (CU/DU)
- Software:
Ubuntu 22.04 LTS
Kubernetes (K8s) or Minikube
Docker
Helm
O-RAN Software Community (OSC) Near-RT RIC components
Example xApps (e.g., KPIMON)
Prerequisites
Before starting the experiment, ensure the following prerequisites are met:
Kubernetes Cluster: - A running Kubernetes cluster (or Minikube for local testing) - kubectl configured to access the cluster
Docker: - Docker installed and configured - Access to Docker Hub or a private Docker registry
Helm: - Helm 3 installed
Network Configuration: - Network connectivity between the Kubernetes cluster and E2 Nodes - Required ports open in firewalls
Experimental Procedure
Setting Up the Environment
Install Required Tools:
# Update package list
sudo apt update

# Install Docker
sudo apt install -y docker.io
sudo systemctl enable docker
sudo systemctl start docker
sudo usermod -aG docker $USER

# Install kubectl
curl -LO "https://dl.k8s.io/release/$(curl -L -s https://dl.k8s.io/release/stable.txt)/bin/linux/amd64/kubectl"
chmod +x kubectl
sudo mv kubectl /usr/local/bin/

# Install Minikube (for local testing)
curl -LO https://storage.googleapis.com/minikube/releases/latest/minikube-linux-amd64
sudo install minikube-linux-amd64 /usr/local/bin/minikube

# Verify installation Minikube
minikube version

# Install Helm
curl https://raw.githubusercontent.com/helm/helm/main/scripts/get-helm-3 | bash

# Reboot
sudo reboot
Start Minikube (for local testing):
# Optional: Can mention number of cpus, memory, disk size
minikube start
minikube start --cpus=4 --memory=8192 --disk-size=50g
Clone the O-RAN SC Near-RT RIC Repository:
git clone https://gerrit.o-ran-sc.org/r/ric-plt/ric-dep
cd ric-dep/bin
Deploying the Near-RT RIC Platform
Deploy the Near-RT RIC Platform using Helm:
#Set permission
sudo cp linux-386/chartmuseum /usr/local/bin/
sudo chmod +x /usr/local/bin/chartmuseum

# Install chartmuseum into helm and add ric-common templates
cd ric-dep/bin
./install_common_templates_to_helm.sh
Installing the RIC:
 # Install latest stable yaml
cd ric-dep/bin
./install -f ../RECIPE_EXAMPLE/example_recipe_latest_stable.yaml
Verify the Deployment:
# Check helm list
helm list -A
Expected output:
NAME              NAMESPACE   REVISION   UPDATED                                 STATUS    CHART                     APP VERSION
kpimon-go         ricxapp     1          2025-12-03 04:24:54.751364892 +0000 UTC  deployed  kpimon-go-2.0.2-alpha     1.0
r4-a1mediator     ricplt      1          2025-12-03 02:34:51.620311600 +0000 UTC  deployed  a1mediator-3.0.0          1.0
r4-alarmmanager   ricplt      1          2025-12-03 02:35:25.243323407 +0000 UTC  deployed  alarmmanager-5.0.0        1.0
r4-appmgr         ricplt      1          2025-12-03 02:34:17.62914857  +0000 UTC  deployed  appmgr-3.0.0              1.0
r4-dbaas          ricplt      1          2025-12-03 02:34:09.281926172 +0000 UTC  deployed  dbaas-2.0.0               1.0
r4-e2mgr          ricplt      1          2025-12-03 02:34:34.672115872 +0000 UTC  deployed  e2mgr-3.0.0               1.0
r4-e2term         ricplt      1          2025-12-03 02:34:43.139295089 +0000 UTC  deployed  e2term-3.0.0              1.0
r4-infrastructure ricplt      1          2025-12-03 02:33:58.687369895 +0000 UTC  deployed  infrastructure-3.0.0      1.0
r4-o1mediator     ricplt      1          2025-12-03 02:36.16.742097917 +0000 UTC  deployed  o1mediator-3.0.0          1.0
r4-rtmgr          ricplt      1          2025-12-03 02:34:26.268472813 +0000 UTC  deployed  rtmgr-3.0.0               1.0
r4-submgr         ricplt      1          2025-12-03 02:35:00.014034404 +0000 UTC  deployed  submgr-3.0.0              1.0
r4-vespamgr       ricplt      1          2025-12-03 02:35:08.3747170262 +0000 UTC deployed  vespamgr-3.0.0            1.0
# Display all pods in the ricplt namespace
kubectl get pods -n ricplt
Expected output:
NAME                                                        READY   STATUS    RESTARTS        AGE
deployment-ricplt-a1mediator-75885f5785-8p9bw               1/1     Running   0               162m
deployment-ricplt-alarmmanager-589c67ff5c-k4zhw             1/1     Running   0               162m
deployment-ricplt-appmgr-7cc64977f-f5f6z                    1/1     Running   0               163m
deployment-ricplt-e2mgr-59c9644bd4-jlw5l                    1/1     Running   0               163m
deployment-ricplt-e2term-alpha-84796cfbb-gw7ml              1/1     Running   0               163m
deployment-ricplt-o1mediator-7c796b48f-xxtxd                1/1     Running   0               162m
deployment-ricplt-rtmgr-6bf9fb98d-tqs76                     1/1     Running   3 (160m ago)    163m
deployment-ricplt-submgr-b8d8b54b-8bkkb                     1/1     Running   0               162m
deployment-ricplt-vespamgr-bbc646c85-cv6kg                  1/1     Running   0               162m
r4-infrastructure-kong-5779769f5c-slc56                     2/2     Running   0               163m
r4-infrastructure-prometheus-alertmanager-dfd846dfc-h5ccs   2/2     Running   0               163m
r4-infrastructure-prometheus-server-568b599bfb-6hw5k        1/1     Running   0               163m
statefulset-ricplt-dbaas-server-0                           1/1     Running   0               163m
# Display infra
kubectl get pods -n ricinfra
Expected output:
NAME                                         READY   STATUS     RESTARTS   AGE
deployment-tiller-ricxapp-7c9c5c9d5f-9wz95   1/1     Running    0          165m
tiller-secret-generator-xtckq                0/1     Completed  0          165m
Checking Container Health
Check the health of the application manager platform component by querying it via the Ingress controller using the following commands:
Get the Minikube IP address:
minikube ipInspect the Ingress resource:
kubectl describe ingress ingress-ricplt-appmgr -n ricplt
If the ingress class is empty, set it to kong:
kubectl patch ingress ingress-ricplt-appmgr -n ricplt --type='merge' -p '{"spec":{"ingressClassName":"kong"}}'
Add the strip path annotation:
kubectl annotate ingress ingress-ricplt-appmgr konghq.com/strip-path="true" -n ricplt --overwrite
Check health using curl:
curl -v http://<minikube ip>:32080/appmgr/ric/v1/health/ready
Replace
<minikube ip>with the actual Minikube IP address obtained from step 1.Expected output:
*   Trying 192.168.49.2:32080...
* Connected to 192.168.49.2 (192.168.49.2) port 32080 (#0)
> GET /appmgr/ric/v1/health/ready HTTP/1.1
> Host: 192.168.49.2:32080
> User-Agent: curl/7.81.0
> Accept: */*
>
< HTTP/1.1 200 OK
< Content-Length: 0
< Connection: keep-alive
< Date: Wed, 03 Dec 2025 05:55:32 GMT
< X-Kong-Upstream-Latency: 1
< X-Kong-Proxy-Latency: 0
< Via: kong/3.6.1
< X-Kong-Request-Id: <request-id>
<
* Connection #0 to host 192.168.49.2 left intact
xApp Implementation
xApp Onboarding using CLI tool called dms_cli:
Install python3 and its dependent libraries, if not installed:
sudo apt install python3-pip
Before any xApp can be deployed, its Helm chart must be loaded into this private Helm repository.
Create a local helm repository with a port other than 8080 on host:
docker run --rm -u 0 -it -d -p 8090:8080 -e DEBUG=1 -e STORAGE=local -e STORAGE_LOCAL_ROOTDIR=/charts -v $(pwd)/charts:/charts chartmuseum/chartmuseum:latest
Set up the environment variables for CLI connection using the same port as used above:
# Set CHART_REPO_URL env variable
export CHART_REPO_URL=http://0.0.0.0:8090
Install dms_cli tool:
# Git clone appmgr
git clone "https://gerrit.o-ran-sc.org/r/ric-plt/appmgr"

# Change dir to xapp_onboarder
cd appmgr/xapp_orchestrater/dev/xapp_onboarder

# Install xapp_onboarder using following command
sudo pip3 install ./

# Add the path to your shell configuration
echo 'export PATH=$PATH:/home/ubuntu/.local/bin' >> ~/.bashrc

# Refresh your current shell
source ~/.bashrc
If the host user is non-root user, after installing the packages, please assign the permissions to the below filesystems:
# Check python version
python3 --version

#Assign relevant permission for non-root user
sudo chmod -R 755 /usr/local/lib/<python<version: example 3.10>
cd
xApp Deployment:
Clone Repository:
git clone https://github.com/o-ran-sc/ric-app-kpimon-go.git
cd ric-app-kpimon-go
Build Docker Image:
Change the Dockerfile:
nano DockerfileUpdate the Go installation section. Change from:
RUN wget -ax --no-check-certificate https://dl.google.com/go/gol.18.linux-amd64.tar.gz \
&& tar -xf gol.18.linux-amd64.tar.gz \
&& rm -f go*.gz
To:
RUN apt-get update && apt-get install -y ca-certificates \
&& wget --no-check-certificate https://dl.google.com/go/gol.18.linux-amd64.tar.gz \
&& tar -xf gol.18.linux-amd64.tar.gz \
&& rm -f go*.gz
Set up Docker registry and build the image:
# Run a local Docker registry
docker run -d -p 5000:5000 --name my_registry registry:latest

# Build the xApp Docker image
docker build --network=host . -t 127.0.0.1:5000/o-ran-sc/ric-app-kpimon-go:latest

# Push the image to the local registry
docker push 127.0.0.1:5000/o-ran-sc/ric-app-kpimon-go:latest
Onboard xApp via dms_cli:
cd deploy
dms_cli onboard --config_file_path=config.json --schema_file_path=schema.json
Onboarding status response:
{
  "status": "Created"
}
Get the version:
dms_cli get_charts_listExpected output (example):
[
  {
    "name": "kpimon-go",
    "version": "2.0.2-alpha",
    "apiversion": "1",
    "appVersion": "1.0",
    "description": "Standard xApp Helm Chart",
    "urls": ["charts/kpimon-go-2.0.2-alpha.tgz"]
  }
]
Create directory for Helm charts:
# Create the directory /files/helm_xapp
sudo mkdir -p /files/helm_xapp
sudo chmod 777 /files/helm_xapp
Download Helm chart:
dms_cli download_helm_chart kpimon-go 2.0.2-alpha --output_path ~/files/helm_xapp
Install xApp:
dms_cli install --xapp_chart_name kpimon-go --version 2.0.2-alpha --namespace ricxapp
Verify the xApp Deployment:
Get the name of the pod:
kubectl get pods -n ricxapp
Expected output:
NAME                                    READY   STATUS    RESTARTS   AGE
ricxapp-kpimon-go-b6597fb49-n5j8g       1/1     Running   0          93s
Verify xApp Subscription to E2 Nodes:
Check xApp logs:
kubectl logs -n ricxapp <xApp pod name>
Replace
<xApp pod name>with the actual pod name from step 3.Look for messages indicating successful subscription to E2 Nodes.
Monitor xApp Operation:
Continue monitoring xApp logs:
kubectl logs -n ricxapp <xApp pod name> -f
Replace
<xApp pod name>with the actual pod name from step 3.Look for messages indicating reception of E2 indications and processing of data.
# Get the xApp service IP and port
XAPP_IP=$(kubectl get svc -n ricxapp service-ricxapp-kpimon-http -o jsonpath='{.spec.clusterIP}')
XAPP_PORT=$(kubectl get svc -n ricxapp service-ricxapp-kpimon-http -o jsonpath='{.spec.ports[0].port}')

# Access the xApp API
curl -X GET "http://$XAPP_IP:$XAPP_PORT/ric/v1/kpimon/metrics"
Advanced Experiments
Developing a Custom xApp:
You can develop your own xApp to implement custom control logic. The basic steps are:
Create a new xApp project using the xApp SDK
Implement the required functionality
Build and deploy the xApp as described above
Testing Multiple xApps:
You can deploy multiple xApps and test their interaction. For example:
Deploy a KPIMON xApp to collect metrics
Deploy a Traffic Steering xApp to optimize traffic based on the metrics
Observe how the xApps interact and affect the RAN performance
Integration with Non-RT RIC:
You can integrate the Near-RT RIC with a Non-RT RIC to test policy-based control:
Deploy a Non-RT RIC (e.g., using the OSC implementation)
Configure the A1 interface between the Non-RT RIC and Near-RT RIC
Define and deploy policies from the Non-RT RIC to the Near-RT RIC
Observe how the policies affect the behavior of xApps
Troubleshooting
xApp Deployment Issues:
Check the App Manager logs
Verify the xApp config file format
Check if the Docker image is accessible
E2 Connection Issues:
Check the E2 Manager logs
Verify network connectivity between the Near-RT RIC and E2 Nodes
Check firewall settings
xApp Runtime Issues:
Check the xApp logs
Verify that the xApp is subscribed to the correct E2 service model
Check if the E2 Nodes are sending the expected indications
Conclusion
- This experiment demonstrates how to:
Deploy a Near-RT RIC platform in a Kubernetes environment
Develop and deploy xApps on the Near-RT RIC platform
Connect the Near-RT RIC to E2 Nodes
Test and validate the functionality of the Near-RT RIC and xApps
The Near-RT RIC is a key component of the O-RAN architecture, enabling programmability and intelligence in the RAN. By deploying and experimenting with the Near-RT RIC and xApps, you can gain practical knowledge of O-RAN components and their interactions, and explore the potential of open, intelligent, and programmable RAN.
For architectural details and integration, see the Near-RT RIC Architecture in the Software Architecture section.
References
O-RAN Software Community (OSC): https://o-ran-sc.org/
O-RAN SC Near-RT RIC: https://docs.o-ran-sc.org/projects/o-ran-sc-ric-plt-ric-dep/en/latest/
O-RAN SC xApp SDK: https://docs.o-ran-sc.org/projects/o-ran-sc-ric-plt-xapp-frame/en/latest/
O-RAN Alliance Specifications: https://www.o-ran.org/specifications