Policy-Based Management using Non-RT RIC
Overview
This tutorial details the experimental setup and procedures for deploying and testing an O-RAN Non-Real-Time RAN Intelligent Controller (Non-RT RIC) and establishing communication with a Near-RT RIC via the A1 interface. It covers the complete process from environment setup to policy creation and testing.
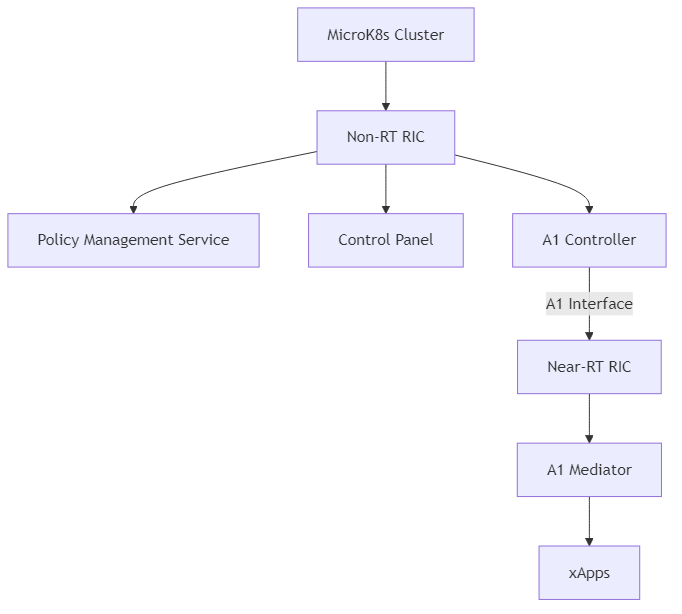
Note
The diagram above shows the experimental setup for the Non-RT RIC, including the MicroK8s cluster, Non-RT RIC components (Policy Management Service, Control Panel, A1 Controller), and the connection to the Near-RT RIC via the A1 interface.
Note: Before deploying the experiment, ensure you have proper access to the testbed (e.g., SSH access to the gateway node and virtual machines).
Objective
Deploy Non-RT RIC: Set up a Non-RT RIC platform in a MicroK8s environment.
Establish A1 Communication: Configure and test the A1 interface between the Non-RT RIC and Near-RT RIC.
Create and Manage Policies: Define policy types and instances, and distribute them to the Near-RT RIC.
Test and Validate: Verify the functionality of the Non-RT RIC and its communication with the Near-RT RIC.
Understand O-RAN Architecture: Gain practical knowledge of O-RAN components and their interactions.
Resources
- Hardware:
Server with sufficient resources (minimum 8 CPU cores, 16GB RAM, 100GB storage)
Network connectivity to Near-RT RIC
- Software:
Ubuntu 20.04 LTS
Docker and Docker Compose
MicroK8s (Kubernetes)
Helm
O-RAN Software Community (OSC) Non-RT RIC components
Prerequisites
Before starting the experiment, ensure the following prerequisites are met:
Ubuntu 20.04 LTS: - A running Ubuntu 20.04 LTS system with sufficient resources
Docker and Docker Compose: - Docker and Docker Compose installed and configured
MicroK8s: - MicroK8s installed and configured
Network Configuration: - Network connectivity between the Non-RT RIC and Near-RT RIC - Required ports open in firewalls
Experimental Procedure
Setting Up the Environment
Install Docker and Docker Compose:
# Add Docker's official GPG key
sudo apt-get update
sudo apt-get install ca-certificates curl
sudo install -m 0755 -d /etc/apt/keyrings
sudo curl -fsSL https://download.docker.com/linux/ubuntu/gpg -o /etc/apt/keyrings/docker.asc
sudo chmod a+r /etc/apt/keyrings/docker.asc

# Add the repository to Apt sources
echo \
  "deb [arch=$(dpkg --print-architecture) signed-by=/etc/apt/keyrings/docker.asc] https://download.docker.com/linux/ubuntu \
  $(. /etc/os-release && echo "$VERSION_CODENAME") stable" | \
  sudo tee /etc/apt/sources.list.d/docker.list > /dev/null
sudo apt-get update

# Install Docker and Docker Compose
sudo apt-get install docker-ce docker-ce-cli containerd.io docker-buildx-plugin docker-compose-plugin

# Verify Docker installation
sudo docker run hello-world
Install MicroK8s:
# Install MicroK8s
sudo snap install microk8s --classic --channel=1.22/stable

# Configure firewall
sudo ufw allow in on cni0 && sudo ufw allow out on cni0
sudo ufw default allow routed

# Verify MicroK8s installation
microk8s kubectl get nodes
microk8s kubectl get services
Configure kubectl to work with MicroK8s:
# Create a wrapper script for kubectl
sudo nano /usr/local/bin/kubectl

# Add the following content to the file
#!/bin/bash
microk8s kubectl "$@"

# Make the script executable
sudo chmod +x /usr/local/bin/kubectl

# Verify the configuration
sudo kubectl get pods -A
Enable MicroK8s Add-ons:
# Enable required add-ons
sudo microk8s enable dns
sudo microk8s enable storage
sudo microk8s enable prometheus
Install Helm:
# Download Helm
wget https://get.helm.sh/helm-v3.5.4-linux-amd64.tar.gz

# Extract and install Helm
tar -zxvf helm-v3.5.4-linux-amd64.tar.gz
sudo mv linux-amd64/helm /usr/local/bin/helm

# Verify Helm installation
helm version
Configure Helm to work with MicroK8s:
# Create Kubernetes configuration
mkdir -p .kube
sudo microk8s kubectl config view --raw > ~/.kube/config
chmod 600 ~/.kube/config

# Configure Helm for root user
sudo mkdir -p /root/.kube
sudo cp ~/.kube/config /root/.kube/config
sudo chmod 600 /root/.kube/config

# Verify Helm configuration
sudo helm ls
helm ls
Clone the O-RAN SC Repository:
# Install Git
sudo apt-get update
sudo apt-get install git-all

# Clone the repository
git clone --recurse-submodules "https://gerrit.o-ran-sc.org/r/it/dep"
Set Up ChartMuseum:
# Set up ChartMuseum
./dep/smo-install/scripts/layer-0/0-setup-charts-museum.sh

# Set up Helm 3
./dep/smo-install/scripts/layer-0/0-setup-helm3.sh
Deploying the Non-RT RIC
Configure the Non-RT RIC:
Before deploying the Non-RT RIC, you need to configure it to communicate with the Near-RT RIC:
# Edit the configuration file
sudo nano dep/nonrtric/helm/policymanagementservice/resources/data/application_configuration.json

# Update the Near-RT RIC base URL
# Change the baseUrl to point to your Near-RT RIC
# Example: "http://<ip-near-rt-ric>:32080/a1mediator"
Deploy the Non-RT RIC:
# Deploy the Non-RT RIC
sudo dep/bin/deploy-nonrtric -f dep/nonrtric/RECIPE_EXAMPLE/example_recipe.yaml
Verify the Deployment:
# Check the pods
sudo kubectl get pods -n nonrtric

# Check the services
sudo kubectl get svc -n nonrtric
Testing A1 Communication
Access the Control Panel:
You can access the Non-RT RIC control panel from a web browser:
http://localhost:30091/
Check Available RICs:
You can check the available RICs using the API:
# Check available RICs
curl -s -X GET "http://localhost:30091/a1-policy/v2/rics"
Configure RIC Connection:
If the Near-RT RIC is not configured, you can configure it:
# Access the RIC configuration page
http://localhost:30091/ric-config

# Update the configuration with the Near-RT RIC IP
# Format: http://<ip-nearrtric-machine>:32080/a1mediator

# Restart the control panel pod and policy management service pod
kubectl delete pod <pod-name> -n nonrtric
Verify RIC Connection:
After configuring the RIC, verify that it’s available:
# Check RIC status
curl -s -X GET "http://localhost:30091/a1-policy/v2/rics"

# The status should be "Available"
Creating and Managing Policies
Create a Policy Type:
First, create a JSON file describing the policy type:
# Create a directory for policy files
mkdir policy_files
cd policy_files

# Create a JSON file for the policy type
cat > create.json << EOF
{
  "name": "bouncer-xapp",
  "description": "tsa parameters",
  "policy_type_id": 20008,
  "create_schema": {
    "$schema": "http://json-schema.org/draft-07/schema#",
    "type": "object",
    "properties": {
      "ue_rc": {
        "type": "array",
        "items": {
          "type": "object",
          "properties": {
            "ue_index": {
              "type": "integer"
            },
            "max_prb": {
              "type": "integer"
            }
          },
          "required": ["ue_index", "max_prb"]
        },
        "minItems": 1,
        "maxItems": 2
      }
    },
    "additionalProperties": false
  }
}
EOF
Register the Policy Type:
Register the policy type with the Near-RT RIC:
# Register the policy type
curl -v -X PUT --header "Content-Type: application/json" --data @create.json "http://<ip-nearrtric-machine>:32080/a1mediator/a1-p/policytypes/20008"

# Alternatively, you can use the inline command
curl -v -X PUT --header "Content-Type: application/json" --data '{"name": "bouncer-xapp", "description": "tsa parameters", "policy_type_id": 20008, "create_schema": {"$schema": "http://json-schema.org/draft-07/schema#", "type": "object", "properties": {"ue_rc": {"type": "array", "items": {"type": "object", "properties": {"ue_index": {"type": "integer"}, "max_prb": {"type": "integer"}}, "required": ["ue_index", "max_prb"]}, "minItems": 1, "maxItems": 2}}, "additionalProperties": false}}' http://<ip-nearrtric-machine>:32080/a1mediator/a1-p/policytypes/20008
Create a Policy Instance:
You can create a policy instance from the control panel:
Go to the control panel (http://localhost:30091/)
Go to the policy control section
Select the created policy type
Use the ‘+’ icon to create a new policy instance of that specific type
After creation, you will see the policy instance ID
Verify Policy Types and Instances:
You can verify the policy types and instances at the Near-RT RIC:
# Check policy types
curl -s -X GET "http://<ip-nearrtric-machine>:32080/a1mediator/a1-p/policytypes/"

# Check policy instances for a specific policy type
curl -s -X GET "http://<ip-nearrtric-machine>:32080/a1mediator/a1-p/policytypes/<policy_type_id>/policies/" | jq .

# Example
curl -s -X GET "http://<ip-nearrtric-machine>:32080/a1mediator/a1-p/policytypes/20008/policies/" | jq .
Pushing Data Through A1 Interface
Create a Payload:
Create a JSON payload to send through the A1 interface:
# Create a JSON file for the payload
cat > data.json << EOF
{
  "ue_rc": [
    {
      "max_prb": 38,
      "ue_index": 0
    },
    {
      "max_prb": 12,
      "ue_index": 1
    }
  ]
}
EOF
Push the Payload:
Push the payload to the Near-RT RIC:
# Push the payload
curl -v -X PUT --header "Content-Type: application/json" --data @data.json "http://<ip-nearrtric-machine>:32080/a1mediator/a1-p/policytypes/<policy_type_id>/policies/<policy_instance_id>"

# Example
curl -v -X PUT --header "Content-Type: application/json" --data @data.json "http://<ip-nearrtric-machine>:32080/a1mediator/a1-p/policytypes/20008/policies/cc688c7a-b96a-4522-a6fb-1159d3cd73fb"

# Alternatively, you can use the inline command
curl -v -X PUT --header "Content-Type: application/json" --data '{
  "ue_rc": [
    {
      "max_prb": 38,
      "ue_index": 0
    },
    {
      "max_prb": 12,
      "ue_index": 1
    }
  ]
}' "http://<ip-nearrtric-machine>:32080/a1mediator/a1-p/policytypes/20008/policies/cc688c7a-b96a-4522-a6fb-1159d3cd73fb"
Verify the Policy Content:
Verify the content of the policy instance:
# Check the policy content
curl -s -X GET "http://<ip-nearrtric-machine>:32080/a1mediator/a1-p/policytypes/<policy_type_id>/policies/<policy_instance_id>" | jq .

# Example
curl -s -X GET "http://<ip-nearrtric-machine>:32080/a1mediator/a1-p/policytypes/20008/policies/cc688c7a-b96a-4522-a6fb-1159d3cd73fb" | jq .
Check Policy Types and Instances at Non-RT RIC:
You can also check the policy types and instances at the Non-RT RIC:
# Check policy types
curl -s -X GET "http://localhost:30091/a1-policy/v2/policy-types"

# Check policy instances
curl -s -X GET "http://localhost:30091/a1-policy/v2/policy-instances"
Additional Commands
Check Gateway of A1 Mediator Service:
# Check ingress in ricplt namespace
kubectl get ingress -n ricplt

# Describe ingress
kubectl describe ingress <ingress_name> -n ricplt
Check Gateway of Policy Management Service:
# Check ingress in nonrtric namespace
kubectl get ingress -n nonrtric

# Describe ingress
kubectl describe ingress <ingress_name> -n nonrtric
Undeploy Non-RT RIC:
If you need to undeploy the Non-RT RIC:
# Undeploy Non-RT RIC
sudo dep/bin/undeploy-nonrtric
Troubleshooting
Policy Type Creation Issues:
Ensure the policy type ID is unique
Verify the JSON schema is valid
Check the Near-RT RIC logs for error messages
Policy Instance Creation Issues:
Ensure the policy type exists
Verify the policy instance ID is unique
Check the Non-RT RIC logs for error messages
A1 Communication Issues:
Verify network connectivity between the Non-RT RIC and Near-RT RIC
Check firewall settings
Ensure the Near-RT RIC A1 mediator is running
MicroK8s Issues:
Check MicroK8s status: microk8s status
Restart MicroK8s if needed: microk8s stop && microk8s start
Check MicroK8s logs: journalctl -u snap.microk8s.daemon-kubelet
Conclusion
- This experiment demonstrates how to:
Deploy a Non-RT RIC platform in a MicroK8s environment
Establish communication with a Near-RT RIC via the A1 interface
Create and manage policies
Push data through the A1 interface
The Non-RT RIC is a key component of the O-RAN architecture, enabling AI/ML-based intelligence in the RAN. By deploying and experimenting with the Non-RT RIC and its communication with the Near-RT RIC, you can gain practical knowledge of O-RAN components and their interactions, and explore the potential of open, intelligent, and programmable RAN.
For architectural details and integration, see the Non-RT RIC Architecture in the Software Architecture section.
References
O-RAN Software Community (OSC): https://o-ran-sc.org/
O-RAN SC Non-RT RIC: https://docs.o-ran-sc.org/projects/o-ran-sc-nonrtric/en/latest/
O-RAN SC A1 Interface: https://docs.o-ran-sc.org/projects/o-ran-sc-ric-plt-a1/en/latest/user-guide-api.html
O-RAN Alliance Specifications: https://www.o-ran.org/specifications